If you need to deploy and host a DocC documentation, the go-to solution for documenting your Swift packages, on Cloudflare Pages, this guide has you covered. Cloudflare Pages is a great alternative to GitHub Pages, especially if you want your documentation to live under a custom domain that you might already have on Cloudflare for that extra bit of polish ✨
Note: We're assuming that you have a Cloudflare account set up. The examples will be using GitHub Actions, but you can adapt them to any CI/CD system you prefer.
Build your DocC documentation
We'll first need to build the DocC documentation. The easiest way is to add the DocC plugin to your Package.swift:
let package = Package(
    // name, platforms, products, etc.
    dependencies: [
        // other dependencies
        .package(url: "https://github.com/swiftlang/swift-docc-plugin", from: "1.1.0"),
    ],
    targets: [
        // targets
    ]
)
You can check the documentation builds by running swift package generate-documentation. To make our lives easier on the CI, we'll generate the documentation into a specific directory and transform it for static hosting:
swift package --allow-writing-to-directory .build/documentation generate-documentation --disable-indexing --output-path .build/documentation --transform-for-static-hosting --target YourProduct
If you have multiple targets you want to generate the documentation for, we can leverage the new --enable-experimental-combined-documentation flag to generate a single documentation for all targets:
swift package --allow-writing-to-directory .build/documentation generate-documentation --disable-indexing --output-path .build/documentation --transform-for-static-hosting --enable-experimental-combined-documentation --target YourProductA --target YourProductB
With this new flag, each target will have its own section in the documentation. In Swift 6.1, this flag will even create an index page:
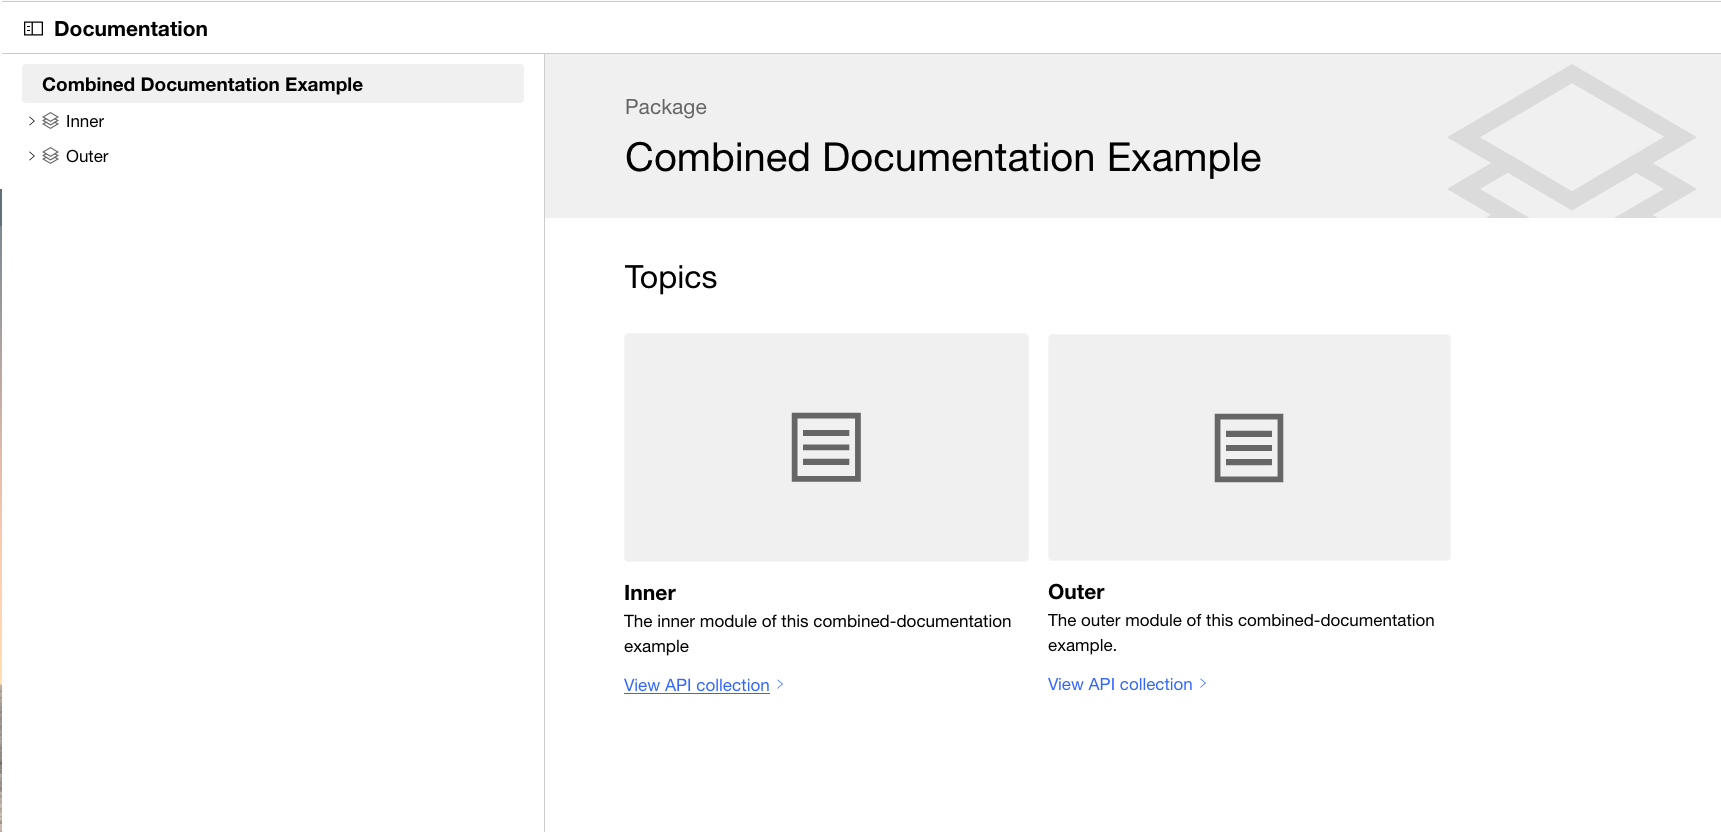
We are very excited about this development as it will make it even easier to host documentation for packages with multiple products, which is quite common.
Set up Cloudflare pages
Let's first set up Cloudflare Pages by going to the Workers & Pages page and creating a new project. Once you have connected your GitHub account, you can import a repository that contains your DocC documentation:
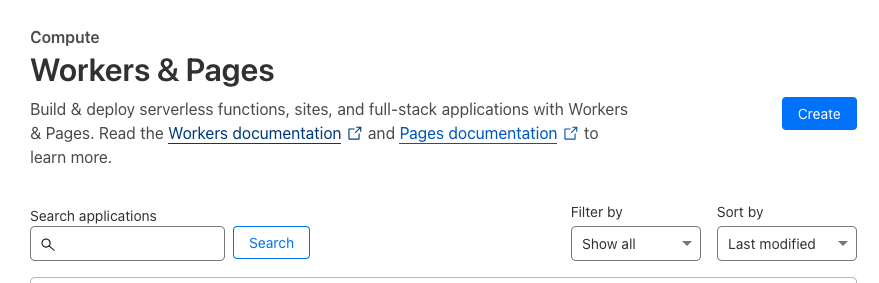
You can also follow the official Cloudflare documentation. Note that since we will be deploying the documentation from GitHub Actions, we'll want to disable automatic deployment in the settings of the Cloudflare Pages project.
GitHub Actions pipeline
Now to the more interesting part. We will need a GitHub Actions pipeline that will build and deploy the DocC documentation to Cloudflare Pages. For this, we'll be using Cloudflare's Wrangler Action. To deploy from GitHub Actions, we will need to grab a Cloudflare API token. If you don't have a Cloudflare API token, you can grab one by following these steps. This token should be set as a CLOUDFLARE_API_TOKEN in your GitHub repository's secrets.
We'll use a Cloudflare example as a base to build out our pipeline:
on:
  push:
    branches:
      - main

jobs:
  deploy:
    runs-on: ubuntu-latest
    name: Deploy
    steps:
      - uses: actions/checkout@v4
      - name: Deploy
        uses: cloudflare/wrangler-action@v3
        with:
          apiToken: ${{ secrets.CLOUDFLARE_API_TOKEN }}
This pipeline will deploy the documentation to Cloudflare Pages every time you push to the main branch. You can adjust the branches field to match your repository's branch naming convention. However, we still need to build the documentation. If your package is buildable on Linux, we can keep the ubuntu-latest machine and we'll need to set up Swift:
jobs:
  deploy:
    runs-on: ubuntu-latest
    name: Deploy
    steps:
      - uses: actions/checkout@v4
      - name: Deploy
      - name: Setup Swift
        uses: SwiftyLab/setup-swift@latest
If your package builds on macOS only, you can switch ubuntu-latest to macos-latest and remove the Setup Swift step.
Before deploying, we'll reuse the step from the previous section to build the documentation and we'll update the deploy step to use the DocC artifacts:
on:
  push:
    branches:
      - main

jobs:
  publish:
    runs-on: macos-latest
    name: Publish to Cloudflare Pages
    steps:
      - name: Checkout
        uses: actions/checkout@v4
      - name: Build docs
        run: |
          swift package --allow-writing-to-directory .build/documentation generate-documentation --disable-indexing --output-path .build/documentation --transform-for-static-hosting --enable-experimental-combined-documentation --target YourProductA --target YourProductB
      - name: Deploy
        uses: cloudflare/wrangler-action@v3
        with:
          apiToken: ${{ secrets.CLOUDFLARE_API_TOKEN }}
          # name-of-your-project is by default the name of the repository
          command: pages deploy .build/documentation --project-name=name-of-your-project
...and that's it 🎉 Your DocC documentation will now be automatically built and deployed to Cloudflare Pages every time you push to the main branch. You can now enjoy your beautifully hosted documentation under your custom domain hosted on Cloudflare Pages.
If you want to see how we use this setup in practice, check out the XcodeGraph repository.